Wednesday, May 8, 2013

Well not much new - same shade of blue.
Well almost. It is a bit lighter.
The health department would rather see fresh paint than have people actually live in houses.
Anyway Redneck has been painting.


Notice - Wilbur, The building Inspector


One dormer done


and another dormer scraped.
BTW that dormer is now almost all painted.
The side to the right still needs to be scraped and painted.

I never knew the Health Department could take away your house if you didn't get it painted in 6 weeks rain or shine. Yup they can do anything they want I guess.

Sunday, March 24, 2013

The Mechanical Systems and Some of My Rants

That's what it's called in the homebuilding industry.  The ductwork, pipes, and wires that keep your heat on, water flowing (and hot when you want it) and lighted at night.  Most of the time, these are specialized trades.  However, I'm more of a generalist than a specialist.  I'm also a redneck.  I have re-wired houses before, including the meter box and breaker panel (had to pass an inspection before the utility company would hook up to it),  and I have plumbed one house from scratch (one we built in 1990--and in that locality at the time, it was legal as long as it was my own house; I just could not hire out to plumb houses for builders).

We have ended up with some new stuff in these areas.  I think we already mentioned the condition of the drainage system; the water pipes were galvanized (which tends to clog up on the inside over the years) and some of them were full of holes.  I had planned to leave much of the wiring in place, until I got into adding some ceiling lights and started finding soldered splices all over the house.  Solder was used in the early days of wiring houses, into the 1920s.  But solder melts when it gets hot--that's part of why it was abandoned.  It also doesn't conduct electricity as well as copper.   These splices are also not in boxes--the rule is, if you splice wires, the splice must be in an electrical box, similar to what is used for switches or outlets (or larger) and must be accessible. (In other words, you have to be able to find it and fix it if something comes loose.)   And since solder is no longer used, mechanical connectors such as wire nuts must be used.  In the 1920s, when almost all wiring was "knob and tube"--individual wires run on porcelain "knobs" fastened to framing, and running through framing with porcelain "tubes"--soldered splices were allowed.  But there was a lot less wiring in most houses, and a lot less electrical devices used in the home.  Apparently this house was wired by someone who had adopted the new material--cable with two or more insulated wires in a fabric sheath (plastic since the '70s) without picking up the methods of working with the new cable.  There were also no government building inspectors to enforce building codes in this area, apparently--not a surprise to me, I've known of rural areas that did not inspect new construction as late as 1990.

THE WATER SYSTEM

I used Pex plastic pipe for the water lines.  As Copperhead mentioned, it is less likely to be stolen.  This house had hot water heat installed in the 1960s, and while it sat empty someone broke in and stole some of the copper pipes from the heating system.  There is some copper and brass in the new system, but not enough to be worth the trouble to find and steal the individual pieces.

I used a "manifold" system; instead of running pipes around the house and putting a branch to each fixture, this has a copper manifold for the incoming water and smaller pipes running directly to each fixture.  Pex is more flexible than copper, so most runs have no fittings between the manifold and the plumbing fixture--that means less cost, less time to put a run together, and better water flow.

One design advantage on this house--the plumbing is compact, all located on one wall of both floors.  I took the drywall off the back side of the bathroom wall, and the plaster off both sides of the wall between the kitchen and half bath.  The upstairs wall is offset about 4" from the kitchen wall, but not enough to be a problem.

The biggest change we have made is in the half bath.  As built, you could enter it from either the kitchen or the front bedroom.  Someone closed off the door to the kitchen later on, and put in a large vanity--which disappeared later.  We left the kitchen door eliminated, and moved the sink and toilet over to make room for a shower--the room is large enough to do this without changing any of the walls.

THE ELECTRICAL SYSTEM

Someone put in a breaker panel in place of the original fuse box some years ago.  It was above the water level in the basement, and showed no signs of damage.  To be safe, I am replacing the breakers with new ones.  I had planned to replace all of the old fabric-covered cable in the basement, using junction boxes to tie in the old wires going to the upstairs.  Since finding the problems with the splices (some of them were inside walls--I don't know how many there are that I haven't seen) I started running new cable for everything.  This is slower and trickier than wiring on open framing in new construction.  You have to plan a path to get where you're going before you even start.  In a lot of places, I had to make three holes in one section of wall--one at the bottom to bring the wire up from the basement, one at the top to get up to the second floor, and one in the middle because of the custom of putting "fire blocking" between the studs halfway up.  In some stud bays I took out the blocking altogether, because I was putting a switch box where it had been.  I did as much as I could of the runs to the second floor through the plumbing walls, since I had them opened up already.  Another complication was running as little wire as possible in the outside walls, to keep from disturbing any more of the blown-in cellulose insulation than was absolutely necessary.

We will now have ceiling lights in the bedrooms where there once were outlets controlled by a wall switch--I put in the special boxes for ceiling fans, with separate switches for the fans and lights.  In most parts of the house, the light and most of the outlets in the room are on separate circuits--a real convenience if something you plug in trips a circuit breaker.  The kitchen has two 20 ampere circuits for small appliances, with ground-fault protection on both (I use the outlets rather than the GFI breakers--it's easier to reset the one in the room than to run to the basement.)  I also put a couple of outlets on separate circuits for window air conditioners--we will probably not be able to afford central air for a while.  The good news is, this house was built before central air was common, so it ventilates pretty well.  Many newer houses have been built for central air and don't have good air flow without it.

AFTERMATH

We've both mentioned the damage to the plaster.  I had planned on drywalling over the plaster anyway.  It isn't in wonderful shape. Part of the reason for that is the moisture from the basement being flooded for several years, part is just the age (yes, plaster has a lifespan--for the old plaster on wood lath, it was about 50 years).  Taking it out completely would lose the insulation in the outside walls and be very messy.  The first floor ceilings are 98" from the floor, so I am attaching 2x4s flat to the ceiling, then will attach drywall to the 2x4s.  That will still leave an 8' foot ceiling height.  On the walls, I will put the drywall directly over the plaster with longer screws than usual.

One last rant:  for years I've known of people who loved plaster walls.  "It's so solid!" they would say.  I say malarkey!  Plaster by itself is not solid; it crumbles easily.  What is solid about plaster is the backing--wood lath until around the 1930s, gypsum lath (essentially 16" x 48" pieces of 3/8" drywall) later on (I once worked on a house built after WW II that had gypsum lath on the walls and wood lath on the ceiling).  Plaster on wood lath often cracks around the lath, and if something hits the wall hard enough the lath can break (it was thin, cheap wood).  Plaster on gypsum lath is stronger, but it still tends to crack at the joints between the gypsum pieces.  And since plaster is a two-to-three layer process, the layers can separate over the years.  One of the biggest reasons the building industry abandoned plaster was the amount time it took.  It was not only the time to install the lath and plaster it; because of the water mixed into the plaster, the house had to be left to dry out for a month or two before painting and finishing could be done!  Drywall can be painted within a day or two after the finishing is done, because the amount of water involved is drastically less.  After 1945, the demand for new housing for returning GIs and their new families forced a lot of changes in home construction; most of them speeded up the process, and many of them actually did improve the quality compared to what was done before.


Insulation Upgraded

The last post mentioned deficiencies in the insulation in this house.  When we first got the place, we weren't sure what it had for insulation at all.  As work was beginning, I found a couple of spots where holes from old toggle bolts or other fasteners allowed a peek into to the wall, and didn't see any.  Inspection of the attic showed about 2" of cellulose, and about 2" of fiberglass batts that had been originally stapled into the rafters but had mostly fallen down.  A few electrical boxes turned out to have some shreds of cellulose in them.  Finally I decided to settle the matter, so I chucked a 1/2" masonry bit into my cordless drill and started going around drilling holes in the walls.  (We were already planning a lot of drywall over the plaster because of the age and condition of the plaster, and if not, holes that small aren't hard to patch.)

What I found:  Sometime, the owners did blow cellulose insulation into the walls, but they didn't do a very good job.  There were areas they had skipped, especially above the windows.  In most places they did not get enough in the wall cavity and it settled, leaving gaps (some of them only 2" high, some of them close to a foot high!)  And of course the channels for the sash weights on each side of the windows (3" wide by 4-5 feet high) had no insulation at all.  There were also places where they guessed wrong about where blocking was between joists and half of the height of a stud bay had no insulation at all.  There was a section of the kitchen wall that was not insulated at all, on the side toward the laundry room that sits between the kitchen and the garage.

The house is now much better insulated.  The attic has been topped up.  On the sloped ceilings above the second floor knee walls I cut out the drywall, pulled out the old 2" fiberglass batting and put in 6", then covered it with new drywall.  We had decided to eliminate the storage areas behind the knee walls (a closet you have to crawl into is a bit of a pain when you're past 60), so I put fiberglass batts in the walls from the back side, then covered the floors with blown cellulose.  On the gable end walls I used a stud finder to locate the blocking and drilled to check for gaps. 

I ended up drilling a lot of holes on this project.  Drywall can be hard on drill bits; plaster is really hard on drill bits.  So I bought a carbide-tipped hole saw to make 1-1/4" holes to blow in the cellulose.  We now have holes all over the outside walls of the house, but they have insulation in them.  You make two holes for each stud bay, one up high and one halfway up.  Even if you don't have blocking in the walls, it's best to fill the bay halfway up first, then finish it from the top.

A few thoughts on fiberglass vs. cellulose:  They each have advantages and disadvantages.  Fiberglass can make your skin itch (washing with vinegar afterwards takes care of it), but it is easy to cut, doesn't take much in the way of tools, and goes up quickly if the walls are open.  You need to wear a dust mask to keep the fiber bits out of your lungs.  It's more recently been found that fiberglass loses its effectiveness at very low temperatures, and air will flow through it.  Cellulose is dusty, requires the use of a machine to shred the bales and blow it in, but does not cause health problems.  They have come up with a wet-spray form of it that can be used in open walls, but it is not a DIY process, and the equipment is not available to the homeowner.  It does NOT lose effectiveness like fiberglass does when it gets colder, which is an advantage for attics.

The biggest hassle on doing the walls was fighting with the blower.  Most of the big-box lumber/building material outfits will sell you the cellulose, and if you buy enough they provide the machine at no cost (you do have to leave a deposit, refundable when you return the machine).  The machines work well enough on attics, where you are blowing it through a 3" hose.  That's probably what most of the customers are doing.  But to do walls, you have to add a restrictor plate to the hopper (design varies according to the manufacturer) and a tapered nozzle that ends up less than a 1" opening.  I spent a lot of the time clearing a clogged nozzle.  As the day went on, my son, who was feeding the machine, worked out a partial solution; when starting a new bale, we took off the nozzle, blew the insulation into an empty garbage can (held about half of the hopper's capacity, shredded), dumped it back into the machine and ran the rest into the can.  Shredding it twice greatly reduced the amount of clogs we had to deal with.

Anyway, it was a long day on the walls, (a house has more wall space than attic floor, plus the smaller nozzle takes longer to move the stuff), but we got it done.  We ran out of material with about 3' of space above the top of one window to finish; I'll break out the plaster in that spot and stuff fiberglass above that window.  But this house should be a lot easier to heat now.

Saturday, November 24, 2012

NEW STUFF!!!
NEW windows - you knew that
NEW doors - you knew that too
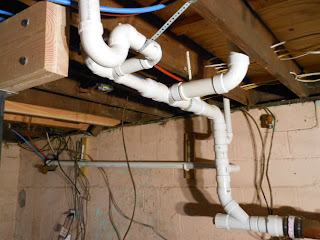
NEW drain pipes
NEW water pipes
NEW wires
AND 
New holes!!! 
YUP New holes

LOTS OF NEW HOLES
That is the living room?
Redneck beat holes 
all over the house.
See the new wires in the wall?
The old wires had a lot of illegal splices - very dangerous
It has taken a lot longer and a whole lot more work than just running a couple extra circuits to the kitchen like we thought.

This will be the inside 
of the 
down stairs
bathroom.
Redneck has put 
in drain pipes, 
water pipes 
and wiring!!! 
The othe
side of the 
wall will 
be the kitchen.
The new drain pipes 
are a lot better 
looking than the
ugly old pipes.
If you scroll 
back a ways
you can see 
them if you 
really want to.    
Pex was used for 
the new water pipes
Pex is cheaper than
copper and less likely 
to get stolen. 
Really.
Can you guess which pipes carry hot and cold water?
This is the work still in progress.
WIRING.....
Redneck has been running 
wires to the attic, 
the second floor, 
the first floor, 
the laundry room 
and the outside lights 
for weeks now.   
Maybe months or decades... 
It is much harder to rewire an old house
than to wire a new one.  Messier too.
 
This is the wall in the bedroom
A lot has changed here, too  - 
Lots of drain pipe, water pipe and wires but if you look inside 
the bathroom the only 
difference is 
MORE HOLES. 
Crazy isn't it.

As soon as the wiring gets done we will need to put in some more insulation - the house has some but some has settled and some places never got any. 


Also some time soon we will need to rent a dumpster to get rid of the trash. Believe me there is trash. I think that first picture is old linoleum from the kitchen floor. Then there is still trash here and there lots of it. Oh and I haven't looked in the garage in a while. Trash in there too. 

Maybe I should sell pictures of trash for modern art. EEWW. 
Maybe Redneck will post something wordy in a while. 


Saturday, September 22, 2012

Follow-Up--And Fall-out--From the Floor

The last post was about the work done to repair the kitchen floor framing.  I have ended up doing more on it since that writing (with a lot of paying work in between, which is why I didn't report this sooner).

Because of the condition the original linoleum was in, we had to give up on it.  Torn places, splits (nailed down, in the middle of the room).  And the 1/2"  plywood underlayment beneath it felt spongy.  Once the linoleum was scraped off, we saw why it felt like that--years of any water that got on the floor puddling in the sag had caused the plywood layers to separate, as well as rusting a lot of the nails.  I ended up peeling off the layers of the plywood in the kitchen, the back entry, and the half bath between the kitchen and the front corner bedroom.

That left the original board subfloor.  Construction methods of 1950 called for framing the floor, then putting diagonal 1x6 boards across the joists for the subfloor.  This was not high-quality lumber; since it would not show once the finish floor was laid, they used #3 grade, the lowest used in construction.

In the 1950s the use of plywood subfloor material displaced the old board subfloor.  And even though carpenters are a conservative bunch (many seem to try to spend their entire career doing things the way they learned to when they started out) they adopted the plywood system pretty quickly, because it was safer for them.  No. 3 lumber can include large knots in the boards, and if someone steps on these knots, especially when carrying something heavy, the board can break at that point.  Some of the older carpenters ended up with scars up and down their legs from breaking through those old board subfloors while the house was being completed.

And this board subfloor had not been helped by the years of puddling water above, and several years of water in the basement below.  There were rotten boards under the sink, broken boards in various places in the kitchen.

I couldn't remove the entire subfloor, because it runs under the walls, outside walls as well as inside.  But I marked lines on the two joists closest to the back wall and the opposite wall, and set lines about two inches out from the other two walls.  I repeated this for the bathroom and the back entry.  Next step was to work along the lines removing any nails in the path of the cut with a cat's paw and hammer to pull them up, and end nippers to pull them out.  Then I set the depth of cut on my power saw to about 7/8", slightly more than the thickness of the boards, (the cut line is barely a scratch on the top of a 10" deep joist, and because of unevenness in the boards often even less than that.).  I went around the room cutting the lines.

By the way, as a safety precaution I was using scrap plywood pieces as a work platform while I did this, to keep from going through the floor myself.  If I had to walk across the room, I tried to always step on a joist location, not on the boards between.  One of our friends had come over to see the place and didn't see why I thought I needed to replace the subfloor--until he stepped on a weak spot and felt it crumple underfoot.  He wasn't hurt, but after that he understood.  It's a bad feeling when you step down and the floor cracks under your feet.  And when you're busy working and thinking about what you're doing, it's hard to remember to only step down on the joists.

So I peeled out the boards with cat's paw and nippers, finished the cuts in the corners with chisel and handsaw when I had to, and as soon as I had a large enough area, I put down the first sheet of 3/4" plywood.  Because of the old wood joists I used decking screws, 2-1/2" long, to put down the plywood.  The screws hold better than nails, and with it all down there is no hint of a squeak from any of the new floor.

I did have one unpleasant surprise when I took out the old boards.  I had sistered new joists onto two of the old floor joists as part of the jacking work.  Now I found one more, between those two, that had cracked from the stress of jacking, even though I had taken it slowly.  And this was not a lengthwise split, but a vertical break in the joist about 8" to one side of the beam, starting at the top and ending about 2" from the bottom edge.  It had happened when I jacked the floor, but I didn't see it from below--partly because of the temporary lighting I was using was shining on it from below, but partly because the crack was widest at the top of the joist.  Effectively, that joist was no longer a 2x10, it was now a 2x2!  (That's why you have to be careful about cutting into framing members--a cut can reduce the effective size of the joist.)  The upper portion of the joist was now only along for the ride, it could no longer give any structural support to the floor.  So, another trip to the lumber yard for joists to sister alongside it as I had the others.

So we now have solid flooring in these areas, a firm platform for the rest of the work to be done.

Saturday, July 14, 2012

SAG REPAIR 101


One thing we had noticed in the kitchen was a serious dip in the middle of the floor, almost 2" lower than at the outside wall.  Prowling around in the basement I discovered two weak floor joists, one with minor rot and one with almost half its length rotted.  Two framing members that could not carry their share of the weight meant extra load on nearby joists, and the floor gradually went down.

How do you identify a rotted joist?  Mold on the joist may only be on the surface, without impairing the strength.  But if part of the surface, especially on the bottom, looks like it has shrunk or caved in a bit, that is one sign.  And if I see that I resort to the knife test:  take a utility knife with a sharp blade, and push the point slowly into the surface at various places.  On sound wood, it will go in about 1/16" to 1/8" and stop; on rotten wood you can push it in 1/2" or more. 


The time to do the fix is now, before we start putting other things together.  I checked the floor slope with my 4' level above and below, from as many angles as I could, and also the surrounding areas.  Very few houses even start out perfectly level everywhere, and most have some settling.  I found that at the end outside wall of the house, the floor joists are almost dead level.  At the other end of the joists, by the center stairways serving the basement and second floor, there is some settling in the middle, probably caused by inadequate footings under the steel posts that support the beams.  It is not as bad as the sag in the middle of the floor, but it is there.  I will try to bring the middle of the floor up so it is between dead level and the beam readings.


I located the center of the kitchen floor joists, then hung some 2x4 blocks next to the center of the joists near the ends of the area I wanted to raise, then added cross pieces to them.  I did this so I could assemble the new beam in place, rather than assemble it on the floor and have to lift the whole thing by myself.  So first I put up a 12' 2x10, then a layer of 1/2 plywood with a few drywall screws to hold it, then another 2x10.  Then, to keep them all in place, I added additional pieces of 2x4.  Having done all this, I drilled holes and fastened the whole thing together with 1/2"  carriage bolts.


 There is an advantage to using the beam in making the floor more solid.  The shorter the joist span between supports, the stronger the floor.  But because of the weakened joists, I also added new joists alongside the two damaged ones.  This technique is called "sistering" in carpentry.  I had to rip them down to 1/4" narrower than the originals in order to get them into the space, and used two pieces rather than one, with the ends supported on the beam.  This is a lot easier than trying to take the old ones out and replace them.


I bought a pair of adjustable jack posts to hold the beam up for the long term, but for the initial jacking I used an old screw jack I acquired at a flea market years ago.  I've heard them called "Model T" jacks or railroad jacks. A couple of friends I used to work with had them also, and none of us ever found anything they could not lift.  I suppose you could use a hydraulic jack, but they are harder to control in a situation like this.  It is preferable to jack up slowly, rather than all at once.  These joists took years to get to the sagged position they are in now; it is not a good idea to try to get them back up immediately.


 Fortunately, we do not have to deal with jacking up a load bearing wall in this area.  If we did, it would be best to break out concrete, pour good-sized footings to support the posts, and generally go to a lot more trouble for this.  Since it is only the floor, I will use solid 4x8x16 concrete blocks as a base for the posts.  I laid an 8' long 4x8 on the floor as a base for the jack, perpendicular to the beam, to spread the load of the jacking over more of the concrete floor.


I rounded up three 2x4s and screwed them together for a temporary post for the jack.  Then I took a pair of framing anchors and used them to attach the post to the center of the new beam with screws.  I attached a two-sided post level that I picked up back in the days when I was building decks occasionally, so I can plumb the post.


Now it is time to start jacking.  I lined the jack up with the center of my plumbed post, slipped the cog onto the side gear, put my crowbar into the slot for the missing handle, and started raising the beam.  First, all I did was take up the slack until the beam started contacting some of the lowest joists.  After a bit, I felt some resistance.  Now comes the time for patience:  I had marked the gear on the top of the jack every 90 degrees, and when I began to feel resistance, I jacked it up until the top gear turned the screw another quarter of a turn, and then stopped.  Tomorrow, and each day after, a quarter of a turn at a time is the procedure.  This gives the wood a chance to adjust slowly and release the stress of the jacking.  When the beam is close to where I hope to get it, then it will be time to install the permanent posts, complete the jacking the last bit of the way, and remove the temporary post and the jack.


It is now the end of the week, and I've been jacking a couple of times a day, checking the floor and the joists, and I think we are almost there.  It is not perfect; there is some difference between one end of the room and the other.  But it is time to install the permanent jack posts and finish the job.  My post level has magnets on the back side, so I don't have to tie it to the posts.  The adjustable posts come with two steel tubes, one slightly smaller than the other, and a bunch of spaced holes and a pair of heavy bolts, plus the screw mechanism and end plates.  I bolted one end plate to the beam at each post location, then worked out how long the post needed to be and assembled it with the bolts in the proper holes to get close to the length I needed.  Then the jack screw goes into the post, and its tip fits into a hole in the end plate.

 One note:  the manufacturer recommends assembling it differently, depending on whether you are using a steel beam or a wooden on.  For a steel beam, the adjusting screw goes on top; for a wood beam it goes on the bottom.  I don't know for sure, but I suspect this has to do with spreading the stress out more over the surface on a wood beam.  I do not have the manpower to handle a steel beam--they are heavy.  And pound for pound, wood is actually stronger than steel.  Besides, as I mentioned above, I could assemble the wood beam in place by myself.

I assembled both posts, checked things with my levels, and began jacking using the new posts.  At the end, I did a little extra on the post at the outside wall.  The temporary post is finally free of the jack.  All of the joists are now sitting on the beam, except the two closest to the outside wall.  The second joist in has about 1/8" or less gap between it and the beam.  The outer one has about 1/4"-5/16" gap.  I will shim these to get contact with the beam; trying to get it any farther may throw things off too much with the floor past the end of the beam.  When I started jacking, the gap at the outside joist was about an inch or more.


When I started, the center of the kitchen floor was sunk down lower than either end of the room, and lower than the back wall of the house.  Now the dip is gone.  There is some slope from one side to the other, but it is fairly uniform all the way across.  This is about the maximum that is practical to do on this house.


Wednesday, July 4, 2012

PART ONE HOW TO REPLACE A WINDOW
I had hinted about a post on replacing double-hung windows, and Copperhead is holding me to it.

 This is the last window to be replaced on the house, the smallest (28" wide x 34" high--the others were either 36"x46" or 40"x54") and in the best shape.  This window is in the first floor bathroom, and faces north.  The windows on the east, west and south were missing glazing compound, missing ropes, had broken glass, and storm window issues on more than half of them--missing glass and even missing wood.

Another factor on replacing the windows rather than repairing them is the matter of the sash weight pockets.  These amount to a 2" wide strip down each side of each window for the sash ropes and weights to operate in.  This comes out to four inches by four to five feet of uninsulated wall for each window, multiplied by sixteen windows makes about a five-foot square hole in your insulation.  These wood windows also had no weatherstripping at all.  They were a tighter fit in the frames than some of the windows I have worked on from the early 1900s, but still not tight enough in these days of expensive energy.


Another factor was the lead paint issue.  There has been a lot of noise and heat on that subject, but not really much light.  Not all houses are equally hazardous in this respect.  While using lead compounds in paint was not officially banned until 1978, the paint companies began using other pigments during World War II, because lead was needed for the war effort (my source on this was an old friend who worked as a paint chemist for a regional paint manufacturer).  So it is less likely that this house, built around 1950, has as much lead-based paint that would be found on on a home built in the late 1800s or early 1900s.  But if there is lead paint, it will be on woodwork and exterior wood, not on plaster or drywall.  And the primary risk is not paint chips, which if swallowed will likely pass through undigested, but from paint dust generated by painted wood parts rubbing against each other--a window in its frame or a door that rubs on its jamb.  Replacing the windows removes that possible source, if they should have lead-based paint under the later coats accumulated through the years.

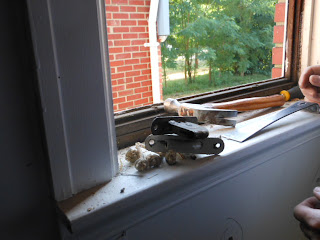
It does not take a lot of tools to handle this job.  I think I left my small handsaw out of this picture, but I could get by without it by using the chisel.

The first step, before getting the replacement window, is measuring.  Open the window, and get the closest measurement you can from side to side in the track the window slides in, and then from top to bottom. If the case of the tape measure will not fit inside the track, measure to the joint between the inside stop molding and the window frame.  Once you have these measurements, you will need a replacement window half and inch narrower and a quarter of an inch shorter than the measurements of the opening. 

When you have the window, there is one more issue to think about--do you need a helper to handle the units with you?  This particular window is small; I could handle it alone.  I also did the rest of the windows alone.  But I have done window replacements for years, since the late '80s.  I will admit the first floor windows were about as big as I am willing to handle alone;  for larger windows I would prefer to have another person.  Double-pane glass is heavy, and expensive if it breaks.  The windows I installed in the second floor were marked as weighing 44 pounds, the larger ones for the first floor were about 54 pounds each.  This window was only about 20-25 pounds.

TAKING THE OLD UNIT OUT

Now, we have the properly sized replacement unit on hand, and are ready to remove the old window sashes.  This house was built toward the end of the use of wood double-hungs with sash weights, but these old windows are not much different from those used 100-200 years ago.  The first thing to come out is the stop molding, shaped pieces of trim that surround the top and sides of the sash channels.  Find the joint between molding and frame, and carefully use a small pry bar to pull it off.  It may help at the start to use a knife to cut any paint on the junction.  Again, pry gently; old wood may be dried out and can break more easily.


Once the moldings are out on all three sides, lift the lower, inside sash and pull one side out of the frame.  Then look for the groove in the side of the sash where the rope is strung.  Usually the rope is secured at the end of the groove by a knot; sometimes someone has put a nail through the knot.  Pull the knot out, ease the rope up until the sash weight bottoms out in its pocket in the wall, pull the sash the rest of the way out and remove the other rope.  Set the sash out of the way until you dispose of it.  Note:  some windows may have been converted to a small chain rather than rope, which can deteriorate and break after many years.  This chain will be either nailed or screwed into the end of the groove, but otherwise it works the same way.


Next, you must remove the "parting strip" between the two sashes.  It is a small strip of wood, usually 1/2" by 3/4" fitted into a groove in the frame to separate the two sashes.  Again, it will be on the top and both sides.  A chisel may help to get it started coming out of the groove, then the pry bar to get it free.  Sometimes it is easiest to break it just below the upper sash, lower the sash past the broken end, and then pry out the rest.  (If you are removing the sash to repair the window, either replacing glass or glazing compound, you will have to work harder to get it out intact because you will have to put it back in later.])

Once the upper sash is out and put aside with the lower, remove the rest of the parting strips from the frame[.  The last piece that defines the channels for the sashes is called a "blind stop" and it is left to hold the new window in place.

We still have to deal with the sash weights and ropes, and the pulleys sticking out of the frame near the top of the window.  On the lower part of each side, formerly covered by the lower sash, will be a wood access cover for the sash pockets.  On older windows this is often loose in the frame, and can be popped out.  On the windows in this house, they were cut vertically at each side, but cut only halfway through, unless someone had pulled it out to repair the window in the past (maybe one or two windows in the whole house).  I had to use the pry bar and break these out.

Then I cut the knots off the sash ropes, reached in and pulled out the cast iron sash weights[077], then pulled the ropes out of the pulleys.  The pulley assemblies are mortised into the wood and have screws at the top and bottom.  Often the screws have been painted, and it is necessary to use a sharp knife to get enough paint out to get the screwdriver into the slot and remove the screws.

Put the pocket covers back into their places, and the window is removed.  Cleaning up any dirt, dust or debris is next, and we are ready for the new window.