PART ONE HOW TO REPLACE A WINDOW
I had hinted about a post on replacing double-hung windows, and Copperhead is holding me to it.

This
is the last window to be replaced on the house, the smallest (28" wide x
34" high--the others were either 36"x46" or 40"x54") and in the best
shape. This window is in the first floor bathroom, and faces north.
The windows on the east, west and south were missing glazing compound,
missing ropes, had broken glass, and storm window issues on more than
half of them--missing glass and even missing wood.
Another factor on replacing the windows rather than repairing them
is the matter of the sash weight pockets. These amount to a 2" wide
strip down each side of each window for the sash ropes and weights to
operate in. This comes out to four inches by four to five feet of
uninsulated wall for each window, multiplied by sixteen windows makes
about a five-foot square hole in your insulation. These wood windows
also had no weatherstripping at all. They were a tighter fit in the
frames than some of the windows I have worked on from the early 1900s,
but still not tight enough in these days of expensive energy.
Another factor was the lead paint issue. There has been a lot of
noise and heat on that subject, but not really much light. Not all
houses are equally hazardous in this respect. While using lead
compounds in paint was not officially banned until 1978, the paint
companies began using other pigments during World War II, because lead
was needed for the war effort (my source on this was an old friend who
worked as a paint chemist for a regional paint manufacturer). So it is
less likely that this house, built around 1950, has as much lead-based
paint that would be found on on a home built in the late 1800s or early
1900s. But if there is lead paint, it will be on woodwork and exterior
wood, not on plaster or drywall. And the primary risk is not paint
chips, which if swallowed will likely pass through undigested, but from
paint dust generated by painted wood parts rubbing against each other--a
window in its frame or a door that rubs on its jamb. Replacing the
windows removes that possible source, if they should have lead-based
paint under the later coats accumulated through the years.
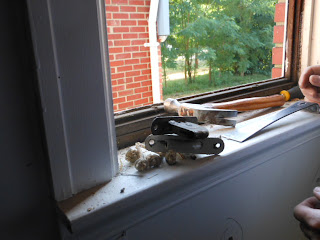
 |
| It does not take a lot of tools to
handle this job. I think I left my small handsaw out of this
picture, but I could get by without it by using the chisel. |
 |
| The first step, before getting the
replacement window, is measuring. Open the window, and get the closest
measurement you can from side to side in the track the window slides in,
and then from top to bottom. If the case of the tape measure will not
fit inside the track, measure to the joint between the inside stop
molding and the window frame. Once you have these measurements, you
will need a replacement window half and inch narrower and a quarter of
an inch shorter than the measurements of the opening. |
 |
When you have the window, there is one more issue to think about--do
you need a helper to handle the units with you? This particular window
is small; I could handle it alone. I also did the rest of the windows
alone. But I have done window replacements for years, since the late
'80s. I will admit the first floor windows were about as big as I am
willing to handle alone; for larger windows I would prefer to have
another person. Double-pane glass is heavy, and expensive if it
breaks. The windows I installed in the second floor were marked as
weighing 44 pounds, the larger ones for the first floor were about 54
pounds each. This window was only about 20-25 pounds.
|
 |
TAKING THE OLD UNIT OUT
Now, we have the properly sized
replacement unit on hand, and are ready to remove the old window
sashes. This house was built toward the end of the use of wood
double-hungs with sash weights, but these old windows are not much
different from those used 100-200 years ago. The first thing to come
out is the stop molding, shaped pieces of trim that surround the top and
sides of the sash channels. Find the joint between molding and frame,
and carefully use a small pry bar to pull it off. It may help at the
start to use a knife to cut any paint on the junction. Again, pry
gently; old wood may be dried out and can break more easily. |


 |
Once the moldings are out on all three sides, lift the lower, inside
sash and pull one side out of the frame. Then look for the groove in
the side of the sash where the rope is strung. Usually the rope is
secured at the end of the groove by a knot; sometimes someone has put a
nail through the knot. Pull the knot out, ease the rope up until the
sash weight bottoms out in its pocket in the wall, pull the sash the
rest of the way out and remove the other rope. Set the sash out of the
way until you dispose of it. Note: some windows may have been
converted to a small chain rather than rope, which can deteriorate and
break after many years. This chain will be either nailed or screwed
into the end of the groove, but otherwise it works the same way.
|

 |
Next, you must remove the "parting strip" between the two sashes.
It is a small strip of wood, usually 1/2" by 3/4" fitted into a groove
in the frame to separate the two sashes. Again, it will be on the top
and both sides. A chisel may help to get it started coming out of the
groove, then the pry bar to get it free. Sometimes it is easiest to
break it just below the upper sash, lower the sash past the broken end,
and then pry out the rest. (If you are removing the sash to repair the
window, either replacing glass or glazing compound, you will have to
work harder to get it out intact because you will have to put it back in
later.]) |
 |
Once the upper sash is out and put aside with the lower,
remove the rest of the parting strips from the frame[. The last piece
that defines the channels for the sashes is called a "blind stop" and it
is left to hold the new window in place.
|
 |
| We still have to deal with the sash weights and ropes, and the
pulleys sticking out of the frame near the top of the window. On the
lower part of each side, formerly covered by the lower sash, will be a
wood access cover for the sash pockets. On older windows this is often
loose in the frame, and can be popped out. On the windows in this
house, they were cut vertically at each side, but cut only halfway
through, unless someone had pulled it out to repair the window in the
past (maybe one or two windows in the whole house). I had to use the
pry bar and break these out. |
 |
| Then I cut the knots off the sash ropes,
reached in and pulled out the cast iron sash weights[077], then pulled the
ropes out of the pulleys. The pulley assemblies are mortised into the
wood and have screws at the top and bottom. Often the screws have been
painted, and it is necessary to use a sharp knife to get enough paint
out to get the screwdriver into the slot and remove the screws. |
 |
| Put the
pocket covers back into their places, and the window is removed.
Cleaning up any dirt, dust or debris is next, and we are ready for the
new window. |


Nice work...both on the window and on reporting it here on the blog!!
ReplyDeleteUndoubtedly, the first things to prepare in replacing windows are your tools. Then, you have to take measurements. The smallest measurements are used so your replacement windows fit within the opening. Avoid doing the task alone to prevent incurring injuries and or damaging the materials.
ReplyDeleteTameka Lauricella
Thanks for this post! It’s very helpful for every DIY-ers. =) It must be really tough to do window replacements. What do you suggest for a window pane material? I might try doing your instructions with my friend. I really feel like my living room window needs a replacement. Please keep us posted!
ReplyDeleteKermit Lukacs
Just by reading this blog post, I can tell that you're an expert when it comes to replacing windows and other DIY jobs for that matter. You even know the alternatives you can use if ever you don't have the certain tools to use in this kind of project. I wish you're house is just within reach, so I'll be able to ask you if I need help. Hehe!
ReplyDeleteAllyson Ripple